Join me on my adventures from traveling to crafting to being a homeschool parent and everything in between.
Search This Blog
Sunday, March 14, 2021
A Camping Weekend At Shawnee National Forest (March)
My family needed a weekend away! And now that it's March, the weather is finally starting to give us a bit of a break from the constantly freezing temperatures. Plus, we wanted to try our hand at car camping to see if it was something we'd be interested in and thought a trip only 4 hours from our house would be the perfect way to try it out.
So, here's how we spent our weekend:
My husband took a half day on Friday so that we could head down and get there before dark. At around noon, we loaded up the car and drove to Pharoah's Campground. There are only 12 campsites ($10/night) here and it's first come, first serve so we had to stop here first to see if there were any spots available. While the weather was starting to get warmer, it was still a little chilly, so we were hoping it wouldn't be too busy. We were able to secure ourselves a spot, unloaded a couple things, and then headed off for our first "hike".
Sunset hike around the Garden of the Gods Observation Trail:
This trail is technically only about 0.5 mile, but my son is a climber and it was definitely longer than that. We made sure to take our time and take in the beautiful sights you get at sunset. It was a great start to our trip and I highly recommend doing this "trail" if you're visiting the area. It's incredibly easy. Just be careful if you climb out on the rocks. It's about a half mile walk to get to the trailhead from the campsite.
For dinner, we made a fire and cooked some hot dogs. As a side, we made a pasta side on our stove. And of course, we had to have s'mores for dessert. Easy peasy!
We then cleaned everything up from dinner, inflated our car mattress, and got ourselves ready for bed.
Saturday morning, we made pancakes and sausage for breakfast with some coffee to give us that boost we would need for the many hikes we had planned for the day.
Then we headed out for our first hike. Or so we thought...
We had wanted to see Cave in Rock, but unfortunately, it was flooded.
So, we headed to Rim Rock after taking in the views of the Ohio River.
Rim Rock:
On AllTrails, it says it's 1.7 miles, but we didn't do the whole thing. Instead, we headed up the trail in the middle, took the steep downhill off to the left, and then took the stairs into the cavern. We explored there for a while (which is obviously the highlight of the trail) and then headed back up the stairs and continued the trail around back to the parking lot. In total, it was probably about a mile, but maybe more with our exploring. I highly recommend this trail! It was so much fun exploring. Overall, I would say it was fairly easy.
After we finished there, we headed back towards camp. We stopped at the Outpost to pick up some firewood. While we were there, we looked around and ended up buying a postcard and a coffee mug as souvenirs. There were also a few food options in case you forgot something and other souvenir options like t-shirts and sweatshirts and shot glasses. It's a cute little store that's worth a stop if you're in the area. Plus, I didn't feel like their prices were outrageous.
Across the street from the Outpost is the Shawnee Bigfoot so of course we had to stop for a picture! There are a couple parking spots just for this photo op, so you don't have to cross the busy street on foot.
Then, we headed back to camp to make some lunch (sandwiches, chips, and apples). It wasn't anything exciting. Just enough to fuel us up for our next hike.
On our way back out of the Garden of the Gods, we saw an area where you could pull off to the side. Across the street from there was a cool rock feature that you could climb inside of. So, we stopped. It was just a fun little 15 minute detour, but I feel like it's worth noting, just to say that you don't even have to go on a hike to see some of these beautiful rocks.
We then continued on our way to Stone Face.
Stone Face:
If you're using Google Maps to get you here, it only takes you most of the way. Continue until you see a sign for it. Then turn. There is a gravel road that takes you a couple miles to the tiniest little parking area. From there, take the trail. The trail itself isn't too long. I believe it actually keeps going past the actual Stone Face, but I wasn't expecting the trail to be as strenuous as it was, so we just turned back around after we got there and went back. This trail is listed as easy on AllTrails and it is NOT! Don't listen to the lies these people have told you. Read the reviews. It's rough. And at one point, we were literally climbing. But it's beautiful. And there are some pretty great views.
Needless to say, I was extremely tired after that hike, so we decided to forego any additional hikes that day and just head back to camp. We were done a little earlier than we had originally anticipated, so we filled our time by reading and playing cards.
For dinner, we made campfire dip, which we ate with fritos. It's cream cheese, shredded cheese, taco meat, and chili beans. It was so good. Plus, this day was National Oreo Day so we had brought a package along to indulge in for dessert.
The rest of our night was spent hanging out by the fire, just talking and laughing and enjoy each others company.
The next morning, we made scrambled eggs, turkey bacon, and coffee for breakfast. This is honestly, our traditional Sunday breakfast anyway, so we decided not to break from tradition. Plus, this is a super easy breakfast and I'm all about those simple meals while camping.
We packed everything up and made sure we left our campsite cleaner than we left it. Then, we headed out to our first hike, Burden Falls.
Burden Falls:
Getting here was a bit of an adventure. We seriously traveled MILES on a gravel road. I don't know why I kept picking these "middle of nowhere" hikes. But that's where we were. The trail isn't overly marked (as some people have pointed out in reviews on AllTrails) but there were a couple ties on trees that led us to believe we were on the right path. We started by taking the path to the left. It led us through the forest, then down a very steep hill, and then along the stream until we reached the waterfall. Now, technically, I don't think the trail leads all the way up to the waterfall, but that didn't stop us! When you get close, you'll see a large rock (I mean, huge rock). Go to the left of it, and all of a sudden, it will open up to the bottom of the falls. We climbed all over the rocks to get fun pictures. On our way back, we didn't really know which way to go and we had just seen a couple descend from some rocks, so we took that way. I think it's more of an unofficial trail, but enough people had taken that way, that it was obviously a trail. We were literally climbing rocks, but we had so much fun! It was hard, but so worth it. Then, when you get to the top, you'll see the top set of falls, which are small, but beautiful in their own right. Overall, a great trail. Probably a moderate.
I felt invigorated after that trail, so we headed off for one more. This one was a little far if you're staying in the Garden of the Gods area, but it was on our way home. We went to Big Rocky Hollow Trail. Or at least that's what it's called on AllTrails. Although, if you let Google guide you, you will end up in the wrong area. Navigate to the Ferne Clyffe Waterfall Trail. This is a super popular trail, though, and we were lucky to find a parking space.
At this point, we were starting to get hungry for lunch, so we made ourselves some sandwiches and ate at a picnic table right by our car.
Then, we were off again.
Big Rocky Hollow Trail:
This trail is very short: less than 3/4 of a mile out and back. It's very wide, allowing for lots of people to travel on it. I would even say it's handicap accessible. But don't take my word for it. That's just how flat and easy this trail is. It does become even more scenic as you near the waterfall at the end. There are plenty of places to explore and (dare I say) go off trail. The waterfall at the end was only a mild trickle while we were there, but still a fun little hike nonetheless.
At this point, it was starting to get warm, we still had a 3 1/2 hour drive home, and we were all a little tired, so we loaded up the car, and made our way back. We had a great trip and I hope that our experience can help you plan your next trip to Southern Illinois to visit the Shawnee National Forest.
Wednesday, March 10, 2021
Camp Food: What We Ate On Our Weekend Camping Trip
There are so many components to camping, but one of my favorites, is the food!
My little family recently took a weekend trip to Shawnee National Forest in Southern Illinois. We arrived on Friday afternoon and left on Saturday afternoon, which left us with 2 breakfasts, 2 lunches, and 2 dinners to plan and execute. So, here's what we ate!
For our first dinner, we decided to go classic camp food: Hot dogs made over a fire. To add a little extra substance to our meal, we also made a pasta side on our camp stove. And of course, S'mores for dessert! This was an easy, yet delicious, meal.
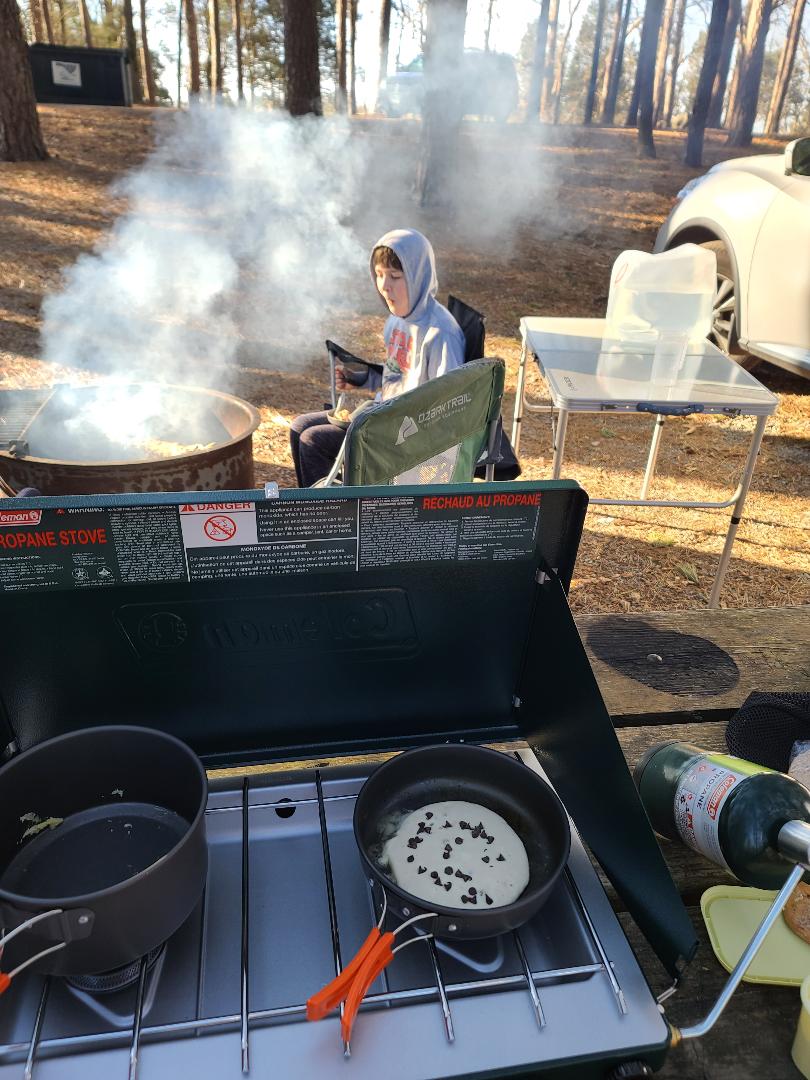
The next day, we woke up and made pancakes (with mini chocolate chips for my son) with some warmed up, precooked sausage on the side. And of course, we had to have some coffee to wake us up!
Tip: Make your meals as uncomplicated as you can. While we loved our breakfast, the pancakes took way longer to make than I had anticipated since we could only make 1 pancake at a time.
For lunch, we just made sandwiches with lunchmeat and cheese and had an apple and chips on the side. (We were in a hurry though, so I didn't take any pictures.)
Next up: dinner! We made some campfire dip, which was absolutely delicious! Here's the recipe:
In an 8x8 foil pan, spread a brick of cream cheese on the bottom. Pour a can of chili beans in chili sauce on top. Spread a pound of pre-cooked ground beef cooked in taco seasoning. Then, top with 2 cups of taco cheese. Cover with foil. Cook over a fire, or on a camp stove, or any way that is available to you. Stir a couple times so that nothing burns. Eat with Frito Scoops.
To make this just a smidge healthier, we made it with Neufchtel (1/3 less fat cream cheese), low fat taco cheese, and turkey instead of beef.
Tip: Don't forget about the dishes you'll need to do! Because we didn't want to handwash plates with tons of cheese dip on them, we just ate right out of the foil pan and then threw away the pan when we were done.
Tip: Prep what you can in advance. Yes, we could have made the taco meat at our camp, but it was way faster and way less effort to just make it at home, put in in a sandwich bag, and then pull it out of the cooler when we were ready to make it! Easy peasy!
The next morning we made scrambled eggs and turkey bacon with coffee for breakfast. It was so simple, yet so great to have hot breakfast to start our day with.
To make scrambled eggs for 3, I whisked together 6 eggs, 6 Tablespoons of milk, 1/2 teaspoon salt, and 1/2 teaspoon pepper together. Cook over medium heat, stirring often, until eggs are the texture you enjoy.
For our coffee, we used these pour over filters from Amazon and just made some hot water in our little kettle on the camp stove.
Our last meal for this trip was lunch. We stopped at a picnic table before our last hike and ate some sandwiches and veggie straws. Super simple. And easy to make out of the back of our car in just a matter of minutes.
That was all the food we ate! Well, except for a couple oreos and some popcorn we had packed for snacks. Camp food shouldn't be complicated. And it helps to prep some stuff in advance. And worse case scenario, go find a restaurant. Don't be scared of cooking while camping, just make sure you leave yourself plenty of time in your schedule. and ENJOY!
My little family recently took a weekend trip to Shawnee National Forest in Southern Illinois. We arrived on Friday afternoon and left on Saturday afternoon, which left us with 2 breakfasts, 2 lunches, and 2 dinners to plan and execute. So, here's what we ate!
For our first dinner, we decided to go classic camp food: Hot dogs made over a fire. To add a little extra substance to our meal, we also made a pasta side on our camp stove. And of course, S'mores for dessert! This was an easy, yet delicious, meal.
The next day, we woke up and made pancakes (with mini chocolate chips for my son) with some warmed up, precooked sausage on the side. And of course, we had to have some coffee to wake us up!
Tip: Make your meals as uncomplicated as you can. While we loved our breakfast, the pancakes took way longer to make than I had anticipated since we could only make 1 pancake at a time.
For lunch, we just made sandwiches with lunchmeat and cheese and had an apple and chips on the side. (We were in a hurry though, so I didn't take any pictures.)
Next up: dinner! We made some campfire dip, which was absolutely delicious! Here's the recipe:
In an 8x8 foil pan, spread a brick of cream cheese on the bottom. Pour a can of chili beans in chili sauce on top. Spread a pound of pre-cooked ground beef cooked in taco seasoning. Then, top with 2 cups of taco cheese. Cover with foil. Cook over a fire, or on a camp stove, or any way that is available to you. Stir a couple times so that nothing burns. Eat with Frito Scoops.
To make this just a smidge healthier, we made it with Neufchtel (1/3 less fat cream cheese), low fat taco cheese, and turkey instead of beef.
Tip: Don't forget about the dishes you'll need to do! Because we didn't want to handwash plates with tons of cheese dip on them, we just ate right out of the foil pan and then threw away the pan when we were done.
Tip: Prep what you can in advance. Yes, we could have made the taco meat at our camp, but it was way faster and way less effort to just make it at home, put in in a sandwich bag, and then pull it out of the cooler when we were ready to make it! Easy peasy!
The next morning we made scrambled eggs and turkey bacon with coffee for breakfast. It was so simple, yet so great to have hot breakfast to start our day with.
To make scrambled eggs for 3, I whisked together 6 eggs, 6 Tablespoons of milk, 1/2 teaspoon salt, and 1/2 teaspoon pepper together. Cook over medium heat, stirring often, until eggs are the texture you enjoy.
For our coffee, we used these pour over filters from Amazon and just made some hot water in our little kettle on the camp stove.
Our last meal for this trip was lunch. We stopped at a picnic table before our last hike and ate some sandwiches and veggie straws. Super simple. And easy to make out of the back of our car in just a matter of minutes.
That was all the food we ate! Well, except for a couple oreos and some popcorn we had packed for snacks. Camp food shouldn't be complicated. And it helps to prep some stuff in advance. And worse case scenario, go find a restaurant. Don't be scared of cooking while camping, just make sure you leave yourself plenty of time in your schedule. and ENJOY!
Sunday, February 14, 2021
I'm Currently Reading...
So, if you've never heard of Virgin River, you may be living under a rock. Well, that may be going too far, but you're definitely missing out. This series of books currently has 21 books. However, I'm just starting and am still reading book number 1. So far, it's pretty good. I quite enjoy Robyn Carr's style of writing and look forward to reading more books in the series.
Virgin River is also a Netflix original series, so I look forward to watching that after I have finished some of the books. I believe there are 2 seasons available right now.
The main story focuses on Melinda Monroe, a midwife and nurse practitioner, who needs a change from the city. She ends up in little Virgin River after a tragic loss. At first, she's not sure if she can handle country life, but she continues to postpone her exit until she finally falls in love with the town and the people living there.
There is an obvious attraction between Mel and the former marine/bar owner, Jack Sheridan that is sheer pleasure to read about.
Every book features different characters, but not necessarily new characters so you get to keep reading about the drama and antics that happen in Virgin River without getting bored by the same main character book after book. I look forward to reading them all! But first, I have to finish the first one...
Virgin River is also a Netflix original series, so I look forward to watching that after I have finished some of the books. I believe there are 2 seasons available right now.
The main story focuses on Melinda Monroe, a midwife and nurse practitioner, who needs a change from the city. She ends up in little Virgin River after a tragic loss. At first, she's not sure if she can handle country life, but she continues to postpone her exit until she finally falls in love with the town and the people living there.
There is an obvious attraction between Mel and the former marine/bar owner, Jack Sheridan that is sheer pleasure to read about.
Every book features different characters, but not necessarily new characters so you get to keep reading about the drama and antics that happen in Virgin River without getting bored by the same main character book after book. I look forward to reading them all! But first, I have to finish the first one...
Sunday, February 7, 2021
Crochet Pattern: Valentine's Envelope
I wanted to make my 10-year-old son a cute little Valentine this year. We started homeschooling a couple years ago and he misses getting a Valentine from all of his classmates. Last year, I roped my husband into helping me make a couple Valentine’s for him, along with one I printed off from an email my Dad sent me. I think we did alright. So, this year, we’re going a step further and adding some little gifts in with the regular Valentine’s.
The first thing I made was this cute envelope that he can use over and over again.
Materials:
-worsted weight yarn (in 2 colors- a main color and an accent color; I used Big Twist Varsity Navy for my main color and a light grey/silver)
-4mm/G hook
-yarn needle
-small piece of velcro
Pattern:
Using your main color, ch 35.
Row 1: sc in 2nd ch from hook, sc across (34)
Row 2-30: ch 1, sc across (34)
Row 31: ch 1, sc in blo across (34)
Row 32-64: ch 1, sc across (34)
Row 65: ch 1, sc in blo across (34)
Row 66: ch 1, sc across (34)
Row 67: ch 1, sc2tog, sc x 30, sc2tog (32)
Row 68: ch 1, sc2tog, sc x 28, sc2tog (30)
Row 69: ch 1, sc2tog, sc x 26, sc2tog (28)
Row 70: ch 1, sc2tog, sc x 24, sc2tog (26)
Row 71: ch 1, sc2tog, sc x 22, sc2tog (24)
Row 72: ch 1, sc2tog, sc x 20, sc2tog (22)
Row 73: ch 1, sc2tog, sc x 18, sc2tog (20)
Row 74: ch 1, sc2tog, sc x 16, sc2tog (18)
Row 75: ch 1, sc2tog, sc x 14, sc2tog (16)
Row 76: ch 1, sc2tog, sc x 12, sc2tog (14)
Row 77: ch 1, sc2tog, sc x 10, sc2tog (12)
Row 78: ch 1, sc2tog, sc x 8, sc2tog (10)
Row 79: ch 1, sc2tog, sc x 6, sc2tog (8)
Row 80: ch 1, sc2tog, sc x 4, sc2tog (6)
Row 81: ch 1, sc2tog, sc x 2, sc2tog (4)
Row 82: ch 1, sc2tog, sc2tog (2)
Row 83: ch 1, sc2tog (1)
Sc around the outside. Sc, ch, sc in each corner.
Finish off and weave in ends.
Assembly:
Fold the rectangle end of your piece at row 31. Since you worked into the back loops, your piece should naturally fold here. Using your yarn needle and main color, sew the sides together.
I used hot glue to attach my velcro, but feel free to attach it in any way that you want. I first glued one side of the velcro in place on the flap at the top. Then, while the two pieces of velcro were still attached to each other, I put hot glue on the side that wasn’t attached and folded it down in place, and glued that piece. This ensures that the velcro will be positioned exactly where you want it to be and everything will line up correctly.
To add extra details, I used my accent yarn to sew around the outside of the letter as shown below.
Then, I added a couple lines in the middle where you would write an address.
The last detail I added was a stamp in the corner. If you want to make this more “Valentine-y” you could make your stamp a heart, but I just wanted this to be a cute letter.
Stamp Pattern:
Ch 6
Row 1: sc in the 2nd ch from the hook, sc across (5)
Row 2-7: ch 1, sc across (5)
Outside: (starting as though you’re doing Row 8) ch 1, hdc, sl st, ch, hdc, sl st, ch, hdc, ch, hdc (working along the side), sl st, ch, hdc, sl st, ch, hdc, sl st, ch, hdc, ch, hdc (working along the bottom), sl st, ch, hdc, sl st, ch, hdc, ch, hdc (working along the other side), sl st, ch, hdc, sl st, ch, hdc, sl st, ch, hdc, sl st to top of first hdc.
Finish off, leaving a long enough tail to sew onto envelope.
Sew stamp onto envelope in the top right corner.
The first thing I made was this cute envelope that he can use over and over again.
Materials:
-worsted weight yarn (in 2 colors- a main color and an accent color; I used Big Twist Varsity Navy for my main color and a light grey/silver)
-4mm/G hook
-yarn needle
-small piece of velcro
Pattern:
Using your main color, ch 35.
Row 1: sc in 2nd ch from hook, sc across (34)
Row 2-30: ch 1, sc across (34)
Row 31: ch 1, sc in blo across (34)
Row 32-64: ch 1, sc across (34)
Row 65: ch 1, sc in blo across (34)
Row 66: ch 1, sc across (34)
Row 67: ch 1, sc2tog, sc x 30, sc2tog (32)
Row 68: ch 1, sc2tog, sc x 28, sc2tog (30)
Row 69: ch 1, sc2tog, sc x 26, sc2tog (28)
Row 70: ch 1, sc2tog, sc x 24, sc2tog (26)
Row 71: ch 1, sc2tog, sc x 22, sc2tog (24)
Row 72: ch 1, sc2tog, sc x 20, sc2tog (22)
Row 73: ch 1, sc2tog, sc x 18, sc2tog (20)
Row 74: ch 1, sc2tog, sc x 16, sc2tog (18)
Row 75: ch 1, sc2tog, sc x 14, sc2tog (16)
Row 76: ch 1, sc2tog, sc x 12, sc2tog (14)
Row 77: ch 1, sc2tog, sc x 10, sc2tog (12)
Row 78: ch 1, sc2tog, sc x 8, sc2tog (10)
Row 79: ch 1, sc2tog, sc x 6, sc2tog (8)
Row 80: ch 1, sc2tog, sc x 4, sc2tog (6)
Row 81: ch 1, sc2tog, sc x 2, sc2tog (4)
Row 82: ch 1, sc2tog, sc2tog (2)
Row 83: ch 1, sc2tog (1)
Sc around the outside. Sc, ch, sc in each corner.
Finish off and weave in ends.
Assembly:
Fold the rectangle end of your piece at row 31. Since you worked into the back loops, your piece should naturally fold here. Using your yarn needle and main color, sew the sides together.
I used hot glue to attach my velcro, but feel free to attach it in any way that you want. I first glued one side of the velcro in place on the flap at the top. Then, while the two pieces of velcro were still attached to each other, I put hot glue on the side that wasn’t attached and folded it down in place, and glued that piece. This ensures that the velcro will be positioned exactly where you want it to be and everything will line up correctly.
To add extra details, I used my accent yarn to sew around the outside of the letter as shown below.
Then, I added a couple lines in the middle where you would write an address.
The last detail I added was a stamp in the corner. If you want to make this more “Valentine-y” you could make your stamp a heart, but I just wanted this to be a cute letter.
Stamp Pattern:
Ch 6
Row 1: sc in the 2nd ch from the hook, sc across (5)
Row 2-7: ch 1, sc across (5)
Outside: (starting as though you’re doing Row 8) ch 1, hdc, sl st, ch, hdc, sl st, ch, hdc, ch, hdc (working along the side), sl st, ch, hdc, sl st, ch, hdc, sl st, ch, hdc, ch, hdc (working along the bottom), sl st, ch, hdc, sl st, ch, hdc, ch, hdc (working along the other side), sl st, ch, hdc, sl st, ch, hdc, sl st, ch, hdc, sl st to top of first hdc.
Finish off, leaving a long enough tail to sew onto envelope.
Sew stamp onto envelope in the top right corner.
Wednesday, February 3, 2021
Recipe: Healthy Dessert Apple Nachos
I LOVE dessert. It's my favorite part of any meal! But when you're trying to eat healthy, it's not always eay to even have dessert, let alone enjoy it. So, here is one of my favorite easy desserts when I have the calories to spare.
Ingredients:
1 apple
2 Tbsp peanut butter
2 Tbsp mini chocolate chips
Steps:
1. Cut your apple into thin slices or rings and place on a plate.
2. Microwave your peanut butter until it is fully melted. This will make your peanut butter appear to go further and get an even coating on all of the apple slices. Pour the peanut butter in a drizzle all over the apples on your plate.
3. Sprinkle the mini chocolate chips evenly over your apples.
Serve and enjoy!
I know this is really simple, but I just love eating them!
Ingredients:
1 apple
2 Tbsp peanut butter
2 Tbsp mini chocolate chips
Steps:
1. Cut your apple into thin slices or rings and place on a plate.
2. Microwave your peanut butter until it is fully melted. This will make your peanut butter appear to go further and get an even coating on all of the apple slices. Pour the peanut butter in a drizzle all over the apples on your plate.
3. Sprinkle the mini chocolate chips evenly over your apples.
Serve and enjoy!
I know this is really simple, but I just love eating them!
Sunday, January 31, 2021
Recipe: Breakfast Cookies
I recently tried a new recipe, changed it a little to make it a little more me, and I seriously love it. Bonus: My husband and son love these as well! Extra Bonus: They're pretty healthy for you! I was hesitant to call these cookies because they're more reminiscent of muffin tops, but we'll stick with the word cookies because those are more fun to eat! Right?
Ingredients:
1 cup whole-wheat flour
¾ cup all-purpose flour
½ cup Hershey’s special dark cocoa
1 ½ Tbsp instant coffee
1 ½ tsp ground cinnamon
1 tsp baking soda
½ tsp kosher salt
3 large eggs, lightly beaten
1 ripe banana, peeled, microwaved 30 seconds, then mashed
½ cup nonfat plain Greek yogurt
½ cup honey
1 Tbsp vegetable oil
2 tsp pure vanilla extract
1 ¼ cups blueberries
¾ cup mini semisweet chocolate chips
Instructions:
1. Heat oven to 350 F. Line 2 large baking sheets with parchment paper.
2. In a large bowl, whisk together flours, cocoa, coffee, cinnamon, baking soda, and salt.
3. In another bowl, whisk together eggs, banana, yogurt, honey, oil, and vanilla until well combined (small lumps of banana are OK).
4. Stir egg mixture into flour mixture, gently stirring until just incorporated. Fold in blueberries and chocolate chips. Do not overmix.
5. Scoop balls of dough, about 1 ½ Tbsp each, onto prepared sheets, about 2 in apart. Flatten cookies slightly by pressing lightly with fingers or back of fork (to keep from sticking, use nonstick spray).
6. Bake until firm around the edges, 12 to 14 minutes. Let cool completely on sheet on wire rack.
Servings: 40
Calories: 73 (When I made these, I used a small scoop and ended up making 46, making them 63 calories a piece.)
Ingredients:
1 cup whole-wheat flour
¾ cup all-purpose flour
½ cup Hershey’s special dark cocoa
1 ½ Tbsp instant coffee
1 ½ tsp ground cinnamon
1 tsp baking soda
½ tsp kosher salt
3 large eggs, lightly beaten
1 ripe banana, peeled, microwaved 30 seconds, then mashed
½ cup nonfat plain Greek yogurt
½ cup honey
1 Tbsp vegetable oil
2 tsp pure vanilla extract
1 ¼ cups blueberries
¾ cup mini semisweet chocolate chips
Instructions:
1. Heat oven to 350 F. Line 2 large baking sheets with parchment paper.
2. In a large bowl, whisk together flours, cocoa, coffee, cinnamon, baking soda, and salt.
3. In another bowl, whisk together eggs, banana, yogurt, honey, oil, and vanilla until well combined (small lumps of banana are OK).
4. Stir egg mixture into flour mixture, gently stirring until just incorporated. Fold in blueberries and chocolate chips. Do not overmix.
5. Scoop balls of dough, about 1 ½ Tbsp each, onto prepared sheets, about 2 in apart. Flatten cookies slightly by pressing lightly with fingers or back of fork (to keep from sticking, use nonstick spray).
6. Bake until firm around the edges, 12 to 14 minutes. Let cool completely on sheet on wire rack.
Servings: 40
Calories: 73 (When I made these, I used a small scoop and ended up making 46, making them 63 calories a piece.)
Wednesday, January 27, 2021
Crochet Pattern: Half-Circle Earrings
I saw some earrings that were similar to these on a shopping website and just had to have them! And since I know how to crochet, I decided to make them myself, instead! And since I liked them so much, I just had to write up the pattern to share with all of you! So, here it is:
Materials:
-5mm hook
-worsted weight yarn (I used Big Twist yarn)
-yarn needle
-round clasp (I used these)
-jump ring
-fish hook earring
-pliers
Pattern:
Ch 2.
Round 1: sc 4 in the 2nd ch from the hook, ch 1, turn (4)
Round 2: sc 2 in each hook around, ch 1, turn (8)
Round 3: (sc, sc inc) x 4, turn (12)
Round 4: ch 1, (sl st, ch 3, sl st in same st, sl st in next st) x 6
Attach earring hardware:
I used these clasps for the rounded, metal part. I thought they really added a cute detail to the earrings. Plus, you only have to squeeze them into place. The ‘teeth’ on the clasps hold nicely to the yarn.
Now, using a jump ring, attach a fish hook earring to the clasp, completing your earring.
Repeat the entire process so that you have 2 earrings!
Materials:
-5mm hook
-worsted weight yarn (I used Big Twist yarn)
-yarn needle
-round clasp (I used these)
-jump ring
-fish hook earring
-pliers
Pattern:
Ch 2.
Round 1: sc 4 in the 2nd ch from the hook, ch 1, turn (4)
Round 2: sc 2 in each hook around, ch 1, turn (8)
Round 3: (sc, sc inc) x 4, turn (12)
Round 4: ch 1, (sl st, ch 3, sl st in same st, sl st in next st) x 6
Top: ch 1, sc x 7 across the top, sl st to beginning of round 4.
Finish off and weave in ends.
Attach earring hardware:
I used these clasps for the rounded, metal part. I thought they really added a cute detail to the earrings. Plus, you only have to squeeze them into place. The ‘teeth’ on the clasps hold nicely to the yarn.
Now, using a jump ring, attach a fish hook earring to the clasp, completing your earring.
Repeat the entire process so that you have 2 earrings!
Sunday, January 24, 2021
Homeschool: Book Review for Read Aloud
A couple months ago, I shared the awesome books that we read aloud while my son was in 4th grade (see that post here). And I'll have some amazing books to tell you about in a couple months when we finish 5th grade! But you know how I know that these are great books? Well, one way is because I have my son do a 1-page book review after each book. Go to the bottom of this post for a free downloadable copy. It looks like this:
It's got everything you would want to know about the book. But at the same time, it's only one page so it doesn't take too long to complete.
Click here for a downloadable copy!
It's got everything you would want to know about the book. But at the same time, it's only one page so it doesn't take too long to complete.
Click here for a downloadable copy!
Wednesday, January 20, 2021
Recipe: Taco Bowl
One of my son's favorite foods is tacos. So, when we started eating healthier and I saw how many calories were in a single tortilla shell, I knew we had to do something else. My husband and I did a little thinking and decided to make a taco bowl, instead. We got our inspiration from Chipotle and Taco Bell. So, I'm here to share that recipe with you, today!
Ingredients:
1 lb ground turkey
1 packet of taco seasoning
1 can pinto beans
1 can corn
Salsa
Low-fat cheese
2 cups Brown rice (4 cups cooked)
Instructions:
1. Cook rice, corn, beans, and taco meat according to the directions on the container.
2. Layer rice, pinto beans, corn, and turkey taco meat, using 1/5 of each. Top with one serving each of salsa and cheese.
Servings: 5
Calories: 480
We love to eat this, probably at least every other week if not once a week. It is so filling and definitely works with my "diet".
Ingredients:
1 lb ground turkey
1 packet of taco seasoning
1 can pinto beans
1 can corn
Salsa
Low-fat cheese
2 cups Brown rice (4 cups cooked)
Instructions:
1. Cook rice, corn, beans, and taco meat according to the directions on the container.
2. Layer rice, pinto beans, corn, and turkey taco meat, using 1/5 of each. Top with one serving each of salsa and cheese.
Servings: 5
Calories: 480
We love to eat this, probably at least every other week if not once a week. It is so filling and definitely works with my "diet".
Sunday, January 17, 2021
I'm Currently Reading...
As a homeschool mom, I don't get a lot of time to myself. However, we do have reading time every single day. This allows me half an hour to read my own book of choice while my son reads his. I think it's important for him to see me reading for joy to show that when you find the right book, reading is an adventure that you should love to be on.
For my first book of 2021, I have chosen to read The Alice Network by Kate Quinn. I had seen it recommended somewhere, but to be honest, I can't think of where.
Quoted from GoodReads
"In an enthralling new historical novel from national bestselling author Kate Quinn, two women—a female spy recruited to the real-life Alice Network in France during World War I and an unconventional American socialite searching for her cousin in 1947—are brought together in a mesmerizing story of courage and redemption.
1947. In the chaotic aftermath of World War II, American college girl Charlie St. Clair is pregnant, unmarried, and on the verge of being thrown out of her very proper family. She's also nursing a desperate hope that her beloved cousin Rose, who disappeared in Nazi-occupied France during the war, might still be alive. So when Charlie's parents banish her to Europe to have her "little problem" taken care of, Charlie breaks free and heads to London, determined to find out what happened to the cousin she loves like a sister.
1915. A year into the Great War, Eve Gardiner burns to join the fight against the Germans and unexpectedly gets her chance when she's recruited to work as a spy. Sent into enemy-occupied France, she's trained by the mesmerizing Lili, code name Alice, the "queen of spies", who manages a vast network of secret agents right under the enemy's nose.
Thirty years later, haunted by the betrayal that ultimately tore apart the Alice Network, Eve spends her days drunk and secluded in her crumbling London house. Until a young American barges in uttering a name Eve hasn't heard in decades, and launches them both on a mission to find the truth...no matter where it leads."
Intriquing, right? Well, I'm only about half-way through the book, and every day during our half hour reading time, I am so curious about how the book is going to end. I look forward to reading it. And I think that in and of itself shows that this is a good book. The Alice Network is definitely a mature book that should not be read by children. It's dramatic. There is pain and suffering and embarrassment and war. There are some sensitive topics like abortion and sex. However, there is also love and friendship. Overall, I'm excited to see how this book ends.
If you have any recommendations of books for me to read, please leave them in the comments below.
For my first book of 2021, I have chosen to read The Alice Network by Kate Quinn. I had seen it recommended somewhere, but to be honest, I can't think of where.
Quoted from GoodReads
"In an enthralling new historical novel from national bestselling author Kate Quinn, two women—a female spy recruited to the real-life Alice Network in France during World War I and an unconventional American socialite searching for her cousin in 1947—are brought together in a mesmerizing story of courage and redemption.
1947. In the chaotic aftermath of World War II, American college girl Charlie St. Clair is pregnant, unmarried, and on the verge of being thrown out of her very proper family. She's also nursing a desperate hope that her beloved cousin Rose, who disappeared in Nazi-occupied France during the war, might still be alive. So when Charlie's parents banish her to Europe to have her "little problem" taken care of, Charlie breaks free and heads to London, determined to find out what happened to the cousin she loves like a sister.
1915. A year into the Great War, Eve Gardiner burns to join the fight against the Germans and unexpectedly gets her chance when she's recruited to work as a spy. Sent into enemy-occupied France, she's trained by the mesmerizing Lili, code name Alice, the "queen of spies", who manages a vast network of secret agents right under the enemy's nose.
Thirty years later, haunted by the betrayal that ultimately tore apart the Alice Network, Eve spends her days drunk and secluded in her crumbling London house. Until a young American barges in uttering a name Eve hasn't heard in decades, and launches them both on a mission to find the truth...no matter where it leads."
Intriquing, right? Well, I'm only about half-way through the book, and every day during our half hour reading time, I am so curious about how the book is going to end. I look forward to reading it. And I think that in and of itself shows that this is a good book. The Alice Network is definitely a mature book that should not be read by children. It's dramatic. There is pain and suffering and embarrassment and war. There are some sensitive topics like abortion and sex. However, there is also love and friendship. Overall, I'm excited to see how this book ends.
If you have any recommendations of books for me to read, please leave them in the comments below.
Subscribe to:
Posts (Atom)
Hocking Hills State Park
A couple weeks ago, we decided to take a weekend trip to Columbus, Ohio for my son’s 11th birthday. Our whole trip started because we just H...
-
My sister is having a little baby girl! Yay! So I decided to make her something that I've made for a couple of my friends who were havin...
-
We arrived at the zoo around 9:15am, only 15 minutes after they opened. We were able to get pretty good parking considering we didn’t get th...
-
My family needed a weekend away! And now that it's March, the weather is finally starting to give us a bit of a break from the constan...